


Why Mold Resistant Sealant for Windows Does Not Always Work
Mold resistant sealant for windows does not always work because it is a protective barrier, not a full mold solution. It can resist mold better than ordinary caulk, but it cannot remove existing mold, dry damp wall materials, fix window leaks, or stop condensation caused by humidity.
Window areas are naturally high-risk because they often sit between indoor and outdoor temperature differences. Warm indoor air may hit cold glass or frames and create condensation. In humid climates, the reverse can also happen when cool indoor air meets hot, humid outdoor surfaces. ENERGY STAR notes that even energy-efficient windows can experience condensation under certain conditions.
Mold often appears around:
- Window corners
- Silicone joints
- Wooden frames
- Aluminum tracks
- Curtain edges
- Window sills
- Wall paint near the frame
- Gaps between trim and wall
The sealant can help close gaps, but it cannot make the whole area dry if the room remains humid. So the right mindset is this: sealant is one part of window mold prevention, not the whole prevention system.
Mistake 1: Applying Sealant Over Existing Mold
The biggest mistake is applying new sealant directly over black spots, mildew stains, or old dirty caulk. This may hide the mold for a short time, but it does not remove the problem.
Mold trapped under sealant can continue to stain, smell, or return around the edges. The new bead may also fail because it is sticking to dirt, mold residue, soap film, dust, or old loose caulk instead of a clean surface.
EPA guidance is very clear: do not paint or caulk moldy surfaces. Moldy surfaces should be cleaned and dried before painting or caulking.
How to fix it
Remove the old moldy sealant first. Use a caulk remover tool, scraper, or utility knife carefully. Then clean the exposed joint with detergent and water. For hard nonporous surfaces, scrub away visible mold and rinse well. Dry the area completely before applying new sealant.
If the wall, wood, or trim under the sealant is soft, swollen, rotten, or deeply stained, do not reseal immediately. That material may need repair or replacement before caulking.
Mistake 2: Sealing a Damp Window Joint
Sealant needs a dry surface to bond properly. If you apply it over damp concrete, wet wood, sweating aluminum, or a moist painted wall, it may peel, bubble, crack, or separate from the surface.
This is common when people reseal windows right after rain, after cleaning, or during a humid morning when condensation is still present. The bead may look good at first, but moisture trapped underneath weakens the seal.
How to fix it
Dry the joint fully before sealing. Wipe visible moisture, then allow enough drying time. Use a fan or dehumidifier if needed. Avoid sealing during rain, heavy humidity, or active condensation.
Check the joint again before applying sealant. If you see water droplets, damp dust, or dark wet patches, wait. Good sealant work starts with a dry surface.
Mistake 3: Ignoring Window Condensation
Many people blame mold on bad sealant when the real problem is condensation. Condensation happens when moist air meets a cold surface. Windows are a common condensation point because glass and frames can become cooler than the room air.
EPA says if condensation or moisture collects on windows, walls, or pipes, you should act quickly to dry the wet surface and reduce the moisture source. EPA also recommends reducing condensation on cold surfaces such as windows by adding insulation where appropriate.
If water forms on the glass every morning and runs down to the frame, mold resistant sealant will be constantly wet. Eventually, dust and organic particles settle on that damp edge, and mold can grow.
How to fix it
Reduce indoor humidity. Use exhaust fans in bathrooms and kitchens. Avoid drying clothes indoors without ventilation. Open curtains during the day to improve airflow around windows. Use a dehumidifier in damp rooms.
If condensation is severe, consider better window insulation, weatherstripping, storm windows, or higher-performance windows. ENERGY STAR explains that certified windows can keep interior glass warmer and may be more resistant to condensation, though condensation can still happen in some conditions.
Mistake 4: Using the Wrong Type of Sealant
Not every sealant is suitable for windows. Some products are meant for bathrooms, some for masonry, some for interior gaps, and some for exterior weather exposure. A mold resistant bathroom silicone may not always be the best choice for exterior window joints exposed to UV, rain, heat, and movement.
For windows, you need a sealant that matches the surface and location. Exterior window joints often need weatherproof, UV-resistant, flexible sealant. Interior window joints may need paintable acrylic latex caulk or mold resistant sealant depending on the material and finish.
How to fix it
Read the label before buying. Check whether the sealant is suitable for:
- Interior or exterior use
- Glass, aluminum, wood, vinyl, masonry, or painted surfaces
- UV exposure
- Movement and expansion
- Paintability
- Wet-area or mold-resistant use
For exterior windows, weather resistance is just as important as mold resistance. For interior window trim, paintability and adhesion may matter more. The best sealant is not only “anti-mold.” It is the one that fits the window material and moisture exposure.
Mistake 5: Leaving Gaps, Cracks, or Thin Beads
A messy or incomplete bead leaves tiny gaps where water and dust can collect. Mold often grows in these weak points because they stay damp longer than the surrounding surface.
Thin beads may also shrink or pull away faster. Overly thick messy beads can trap dirt and look uneven. Both problems make cleaning harder.
How to fix it
Remove failed caulk and apply a clean, continuous bead. Cut the nozzle at the right size for the gap. Use steady pressure. Tool the bead smoothly so it contacts both sides of the joint.
Do not rely on sealant to fill very large gaps by itself. Large gaps may need backer rod or proper repair before caulking. A good seal should be neat, flexible, and fully bonded.
Mistake 6: Not Fixing Exterior Water Entry
Sometimes mold around windows comes from rainwater entering outside, not indoor condensation. Cracked exterior sealant, damaged flashing, wall cracks, poor drainage, or failed window installation can let water seep into the frame or wall.
If this is the case, interior mold resistant sealant is only hiding the symptom.

Water may still be entering from outside and feeding mold behind the wall or trim.
How to fix it
Inspect the exterior side of the window. Look for cracked caulk, gaps, loose trim, damaged flashing, wall cracks, or water stains below the frame. After rain, check whether moisture appears inside.
If the leak is minor and accessible, reseal the exterior with the correct weatherproof sealant. If water is entering behind the wall, call a window repair, waterproofing, or building maintenance professional. Mold will keep returning if the building envelope is leaking.
Mistake 7: Blocking Airflow Around Windows
Windows behind thick curtains, blinds, wardrobes, sofas, or beds often develop mold faster. The reason is simple: air does not move well there. Cool surfaces stay damp longer, and condensation dries slowly.
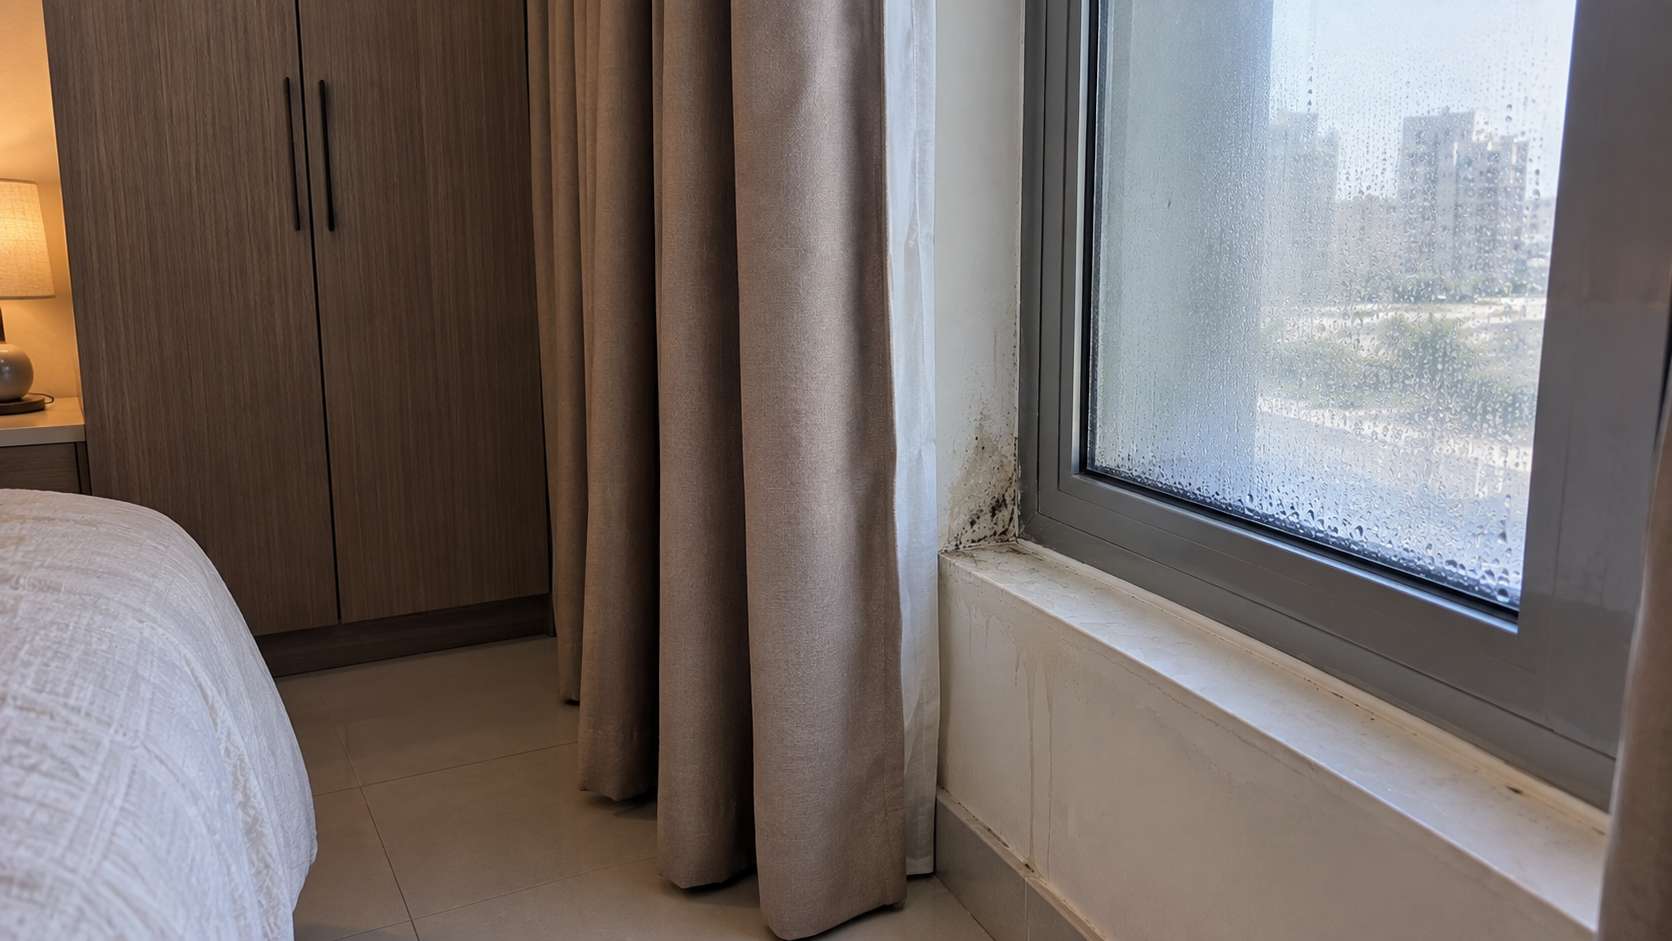
Natural Resources Canada notes that deep window sills, closed drapes and blinds, and nearby furniture can block air movement and allow cool air to pool near a window, which can lead to condensation.
How to fix it
Keep furniture slightly away from window walls. Open curtains or blinds during the day. Do not let fabric touch damp glass or frames. Wipe condensation quickly. In problem rooms, use a small fan or dehumidifier to improve airflow.
This is especially important in bedrooms because people release moisture while sleeping. A closed bedroom with curtains shut all night can create perfect conditions for window condensation and mold.
Mistake 8: Forgetting Regular Cleaning
Mold resistant sealant is not self-cleaning. Dust, pollen, skin particles, cooking residue, and outdoor dirt can settle on window frames and sills. When this dirt becomes damp, mold has food.
Even if the sealant itself resists mold, grime sitting on top of it may still grow mildew.
How to fix it
Clean window frames and sills regularly with mild detergent and water. Dry them afterward. Pay attention to corners, tracks, curtain-side edges, and lower frame areas where water collects.
If you see early black dots, clean them before they spread. Do not wait until the sealant is fully stained.
The Bottom Line
Mold resistant sealant for windows can help stop mold growth, but only when it is used correctly. It works best on clean, dry, properly prepared joints where the moisture source has already been controlled.
The biggest mistakes are caulking over mold, sealing damp surfaces, ignoring condensation, using the wrong product, applying a poor bead, missing exterior leaks, blocking airflow, and forgetting regular cleaning.
To fix the problem, remove old moldy caulk, clean and dry the area, choose the right sealant for the window material, apply it neatly, control humidity, improve airflow, and repair leaks. Mold resistant sealant is useful, but moisture control is what makes it work.