


How Serious Is a Leak Behind Shower Wall?
A leak behind shower wall is serious because the water is trapped where you cannot easily see it. The outside of the bathroom may look clean, but the inside of the wall may be wet after every shower.
This type of leak is different from water splashing on the floor. A splash leak is usually visible and easy to wipe. A hidden shower wall leak can soak tile backing, drywall, insulation, timber, skirting, cabinets, and the ceiling below. If the shower is upstairs, the first visible sign may appear on the ceiling under the bathroom instead of inside the bathroom itself.
The biggest risk is delay. Bathrooms already have high humidity, warm air, and frequent water exposure. When hidden wall materials stay damp, mold has a better chance to grow. The CDC says mold grows where there is moisture, including around leaks in walls or plumbing, and advises fixing leaks so mold does not have moisture to grow.
You should be more concerned if the leak is not new. A one-time splash outside the shower is usually less serious than repeated water intrusion behind tile. If stains are expanding, grout keeps darkening, paint is bubbling, or a musty smell returns after cleaning, assume the issue may be inside the wall.
The earlier you check it, the cheaper and cleaner the repair usually is.
Warning Signs You May Have a Leak Behind the Shower Wall
The easiest way to spot a hidden shower leak is to look for changes around the shower, nearby rooms, and the ceiling below. You may not see flowing water, so small clues matter.

Common warning signs include:
- Musty smell after showering: A damp wall cavity can smell earthy, stale, or moldy.
- Loose or hollow-sounding tiles: Water can weaken adhesive or backing materials.
- Cracked grout lines: Cracks allow water to travel behind tile.
- Failed or peeling caulk: Gaps around corners, shower trays, tubs, and fixtures can let water enter.
- Bubbling paint outside the shower: The opposite side of the shower wall may show damage first.
- Soft drywall or plaster: A wall that feels spongy may already be wet inside.
- Dark stains near the shower edge: This may mean water is escaping behind or under the enclosure.
- Water stains on the ceiling below: In multi-level homes, this is a major warning sign.
- Swollen skirting boards or door frames: Water can move along the floor line.
- Mold returning in the same area: Repeat mold usually means repeat moisture.
Do not judge the problem only by the tile surface. Tile can look fine while water travels through cracked grout, fixture openings, or failed waterproofing behind it. Grout and caulk are small details, but in a shower, small gaps can create big hidden damage.
If you notice more than one sign, stop treating it as a cosmetic issue. A stain, smell, and loose tile together are stronger evidence than one cracked grout line.
Before It’s Too Late, Do These Checks First
Before you start breaking tiles or buying new caulk, do a few simple checks. The goal is to understand whether the leak comes from shower use, plumbing pressure, drainage, or water escaping through the surface.
1. Check the Shower Only After It Has Been Dry
Let the shower dry completely first. Then run the shower and watch what changes. If stains, smells, or dampness appear only after using the shower, the leak may be linked to water hitting the wall, tray, tub edge, or fixture openings.
Look closely at corners, wall-to-floor joints, around the shower mixer, shower arm, handheld hose connection, niche, glass frame, and drain area.
2. Inspect the Caulk and Grout
Failed caulk and cracked grout are common leak paths. Check for gaps, cracks, black lines, missing sections, or areas that pull away from the wall.
Caulk should seal movement joints, corners, and edges. Grout fills tile gaps, but it is not always enough to stop water if the waterproofing behind it has failed. If the caulk has separated from the shower tray or tub, water can run straight behind the wall surface.
3. Look at the Wall Behind the Shower
If there is a room, closet, hallway, or cabinet behind the shower wall, inspect that side too. Look for bubbling paint, soft patches, stains, musty smell, or wall discoloration.
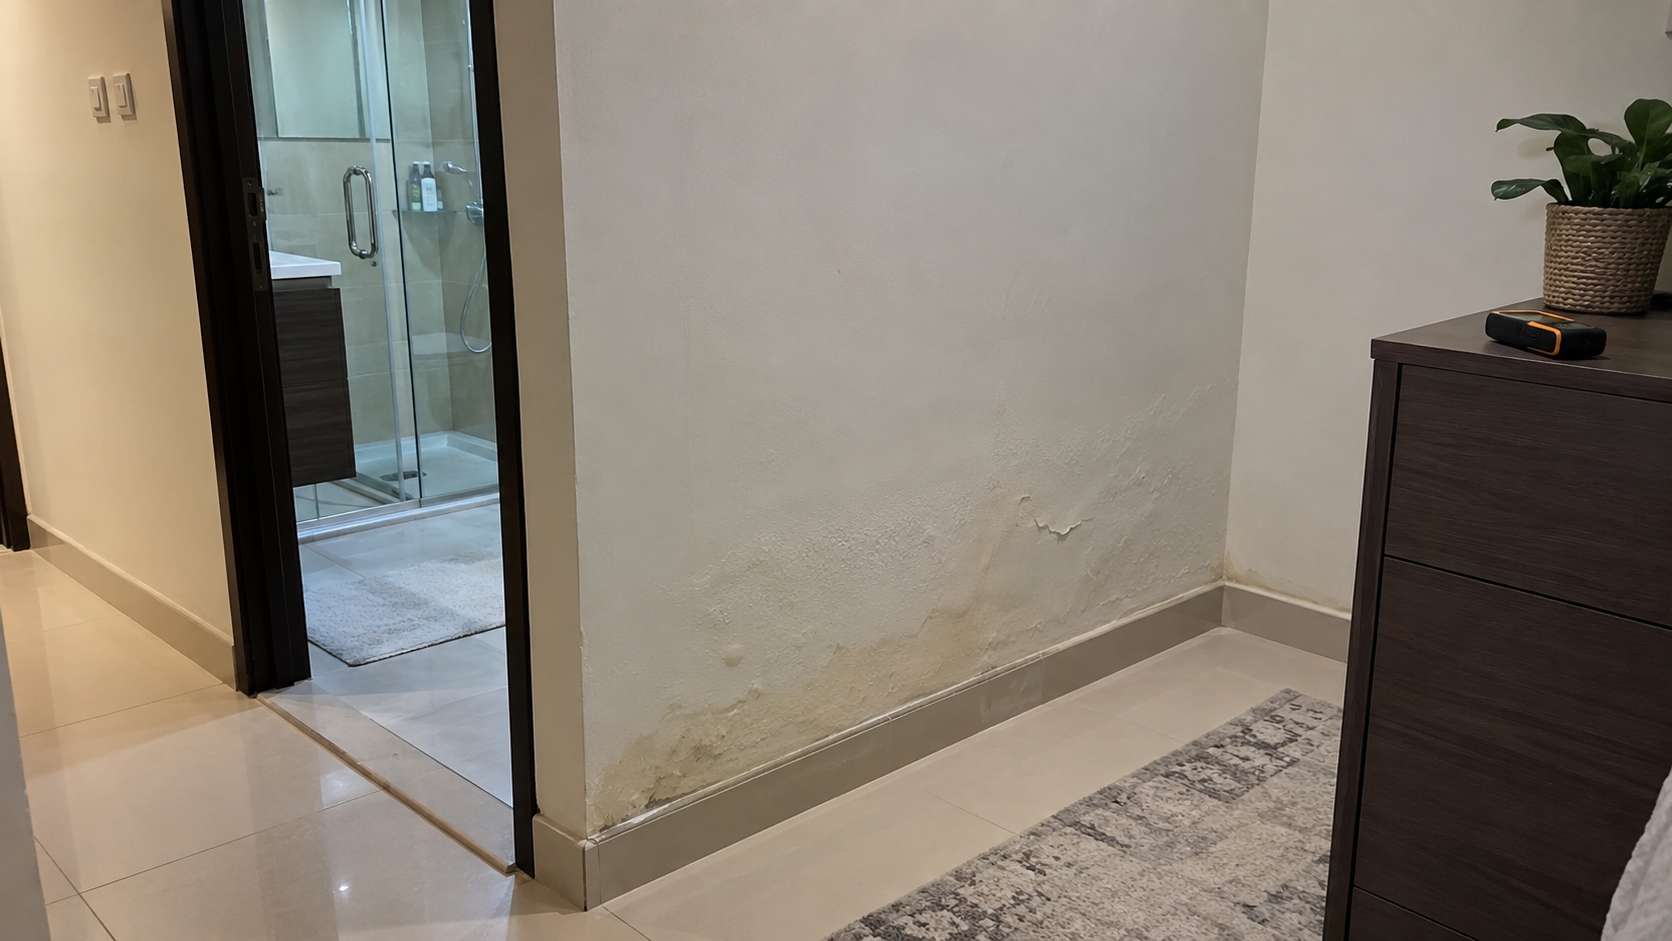
This side often reveals the leak before the bathroom side does because it may be painted drywall rather than tile.
4. Check the Ceiling Below
If the bathroom is upstairs, check the ceiling under the shower. Brown stains, peeling paint, sagging plaster, or recurring damp patches may mean water is moving downward from the shower area.
Do not keep repainting the ceiling without fixing the bathroom leak. Paint hides the symptom, not the cause.
5. Use a Moisture Meter
A moisture meter can help you compare suspicious areas with dry areas. Test around the shower wall, the opposite side of the wall, the floor line, and the ceiling below.
A moisture meter does not tell you the exact leak source by itself, but it helps confirm whether materials are damp. If readings are higher near the shower than elsewhere, the wall may need further inspection.
6. Test the Plumbing Separately From Surface Water
This is important. Sometimes the leak happens only when the shower is running because a pipe or valve leaks inside the wall. Other times, the plumbing is fine, but water enters through cracked grout, failed caulk, or a shower screen gap.
A plumber can pressure-test the line or inspect the valve area. This helps avoid replacing grout when the real problem is a leaking pipe connection.
How to Fix a Leak Behind Shower Wall Properly
To fix a leak behind shower wall properly, you need to fix the source first, then dry the affected area, then repair the finish. Do not start with paint or cosmetic patching.
If the leak is caused by failed caulk, remove the old caulk fully. Clean the joint, let it dry, and apply bathroom-grade mold-resistant silicone. Do not apply new silicone over dirty, wet, or moldy old caulk. It may look good for a few days, then peel or leak again.
If cracked grout is the problem, damaged grout should be removed and replaced. After that, the area should be sealed if the tile system requires it. But be careful: regrouting is not enough if the waterproof membrane behind the tile has failed.
If the leak comes from the shower valve, pipe joint, shower arm, or mixer connection, you need plumbing repair. This may require opening the wall from the bathroom side or the opposite side. It is better to open a small controlled access area than to let water keep spreading behind the tile.
If waterproofing has failed behind the tile, the repair can be more involved. The damaged tiles, backing board, or wet wall materials may need removal. Then the area must be dried, waterproofed again, and retiled correctly. This is not the same as surface caulking.
A proper repair usually follows this order:
- Stop using the shower if moisture is spreading.
- Find the leak source.
- Repair the plumbing, caulk, grout, drain, fixture, or waterproofing failure.
- Remove wet or damaged materials if needed.
- Dry the wall cavity properly.
- Check moisture levels before closing the wall.
- Repair tiles, drywall, paint, and sealant only after drying is confirmed.
The CDC also advises fixing the water problem completely and cleaning mold before painting or caulking. That is the part many people skip. If you cover damp material too soon, the wall may look fixed while the hidden problem continues.
How to Prevent Mold After a Shower Wall Leak
To prevent mold after a shower wall leak, focus on moisture control, drying, and airflow. Cleaning the visible surface is not enough if the wall remains damp inside.
Start by drying the affected area quickly. EPA guidance says water-damaged areas and items should be dried within 24–48 hours to help prevent mold growth. In a hidden wall leak, drying may require opening an access panel, removing wet materials, using fans, or running a dehumidifier.
A few tools can help:
- Moisture meter: Confirms whether the wall is drying or still wet.
- Hygrometer: Tracks bathroom humidity. Try to keep humidity below 60%, and ideally around 30–50% when possible.
- Dehumidifier: Helps reduce moisture in the room after the leak is fixed.
- Exhaust fan: Removes humid air during and after showering.
- HEPA vacuum: Helps clean fine dust and settled particles after repair or mold cleanup.
- Air purifier with HEPA filter: May help reduce airborne particles, but it will not fix active mold or wet walls.
- Water leak detector: Helps catch future leaks early, especially near the shower wall, bathroom vanity, or adjacent plumbing.
A water leak detector is especially useful if mold has appeared before. Place it where water would likely travel first, such as near the wall base, inside the vanity, near the shower plumbing access area, or on the ceiling side below if accessible. Smart leak detectors can send phone alerts, which is helpful if the property is vacant, rented, or used only occasionally.
Also, improve daily bathroom habits. Run the exhaust fan during showers and keep it on after showering. Wipe wet corners. Repair cracked caulk quickly. Do not ignore grout cracks. Keep the shower door or curtain positioned so water does not escape onto wall edges.
Mold comes back when moisture comes back. Your job is to make sure the leak is fixed, the wall is dry, and the bathroom does not stay humid for hours after every shower.
When You Should Call a Professional
You should call a professional if the leak is hidden, recurring, spreading, or connected to plumbing inside the wall. DIY is reasonable for simple caulk replacement, but not for every shower leak.
Call a plumber, leak detection specialist, or mold professional if:
- The wall feels soft or swollen
- Tiles are loose or falling
- You smell mold but cannot see the source
- The ceiling below is stained
- The shower leak keeps returning
- Moisture meter readings stay high
- There is visible mold larger than a small patch
- You suspect a pipe, valve, or waterproofing failure
- You need to open the wall or remove tile
- Someone in the home has asthma, allergies, or respiratory sensitivity
The CDC notes that mold exposure can be linked with symptoms such as stuffy nose, sore throat, coughing, wheezing, burning eyes, or skin rash in some people, and people with asthma or mold allergies may have more severe reactions. This does not mean every shower leak is a medical emergency, but it does mean you should not let damp, moldy materials sit hidden in your bathroom.
Professional help is also useful when you need proof that the wall is dry before closing it. A moisture map, thermal scan, or controlled inspection can prevent the same repair from failing again.
The Bottom Line
A leak behind shower wall is not something to ignore. It may begin as a tiny gap in caulk, cracked grout, loose valve connection, or failed waterproofing, but it can lead to hidden dampness, mold, loose tiles, ceiling stains, and expensive wall repair.
Before it gets worse, check the caulk, grout, fixture openings, opposite side of the wall, ceiling below, and moisture levels. Then fix the actual water source before repairing the surface.
The best approach is simple: find the leak, stop the water, dry the wall, confirm it is dry, then repair the finish. If mold keeps coming back, the shower is telling you the moisture problem is not solved yet.